Tuesday, 24 November 2015

November cute as a button inspiration card

This is my November inspiration card using the Cute as a Button stamp Christmas elves in boots.
I have done a step by step on the cute as a button inspiration blog pop over to http://cuteasabuttonshowcase.blogspot.com/2015/11/november-inspiration-card-by-christine.html if you'd like to see how I did it. I can already see and improvement in my colouring.
Today I'm working on colouring in my chosen stamp for the December challenge, it's a gorgeous one and ties in with plans for next year! Squee it's so exciting but I shall leave that news for another day. 


Monday, 16 November 2015

Wool Christmas tree Angel - Free tutorial

This is step by step photo guide of how to make a wool roving Angel that can sit on your Christmas tree.


What you will need is a 36 or 38 felting needle 
15g wool roving roughly in the colours of your choice I recommend a flesh tone for face and arms and I use white for wings but you can use any colours you wish and some for hair 
A pipe cleaner 
And the inner from a kitchen roll or toilet roll cut to roughly 5cm. 
Double sided Tape, glue and gems 

To start split the flesh tone width ways so you still have a good staple length. 
The fold over into a triangle until it's roughly a ball.
Next felt this using your 36 and 38 needles until it becomes a firm ball but that still has some give (so you can add the hair later 
Now remove two small pieces of flesh tone to wrap the armature thin pieces roughly 1/2cm width at the most. 
Wrap this around the pipe cleaner apron 3-4 cm from the end when you get 1cm from the end fold the end in.
This makes your Angels hand wrap the pipecleaners until you get to the middle.
Repeat for other side.

Now take your remaining flesh wool and fold in half add the flesh ball like pictured and use your needle to,attatched this in a line 
One firmly attatched arrange to wool carefully so it covers the ball 
Now pull a tiny amount 3-4cm long and a few mm thick from the bottom and wrap around like pictures the use needle to secure in place.
Once secured you can add your arms I then split a potion of the wool and wrap around each side and use a tiny piece to secure as before.
Now lay out the wool you are using for the dress.
I pull each one into sections so it's roughly the same staple length then I split them in the middle making a hole 2-3 inches in size
I place it over my angels head layering as I go 
I then tightly hold the middle and use a small band of wool to secure.
I then fluff all the layers out 
If your wish to make a flying Angel skip the next 2-3 steps.
Next for your tree topper het your piece of kitchen roll or toilet roll middle wrap in double sided sticky tape I use double sided tape as it gives it rigidity and stops the glue making the cardboard soggy. Now add glue and place under your Angels skirt 
Now I use a jar filled with pencils or hairs spray can so I can arrange her skirt and make sure that it's sitting correctly 
Now I lightly felt in extra roving to my angels waist so her skirt stays nice and puffy 
Now add on hair lightly felting it to the head 
Then I add gems to her skirt and lastly her wings 
Split the white so it's 6-7 inches staple length band in the middle and the attatched to Angel using felting needle 
So the wings stay in place you can sparingly use hairspray or spray starch to protect from moths add 1-2drops of lavender oil before storing


For my wool Angel I used 5 green tones including moss forest lawn and jade 2-3 g of each roughly 3 g  flesh tone, gingersnap for hair only need a tiny amount and 2g white for the wings 
First step 

Tuesday, 10 November 2015

Sleeping Fairy Cute as a button New realeases

Today is finally new release day Yippee! So I can share with you my lovely Card  (I have a discount code I'll pop at the end). 
To make my card I printed off the sleeping fairy. I coloured her in using my Spectrum Noir Pencils. I then added glossy accents to the flame and glitter to her wings. I then fussy cut out the stamp.
I made an easel card which I then added some music note backing paper from my stash. I die cut some poinsettia paper and a frame which I layered on top of a poinsettia border roughly in the centre using foam pads. 
I then topped my card with acetate for the snowing effect, I finished it off with some punched snowflakes from my X cut small snowflake punch a seasons greetings sentiment backed on the same glitter card and a bow from my ribbon stash.
I throughly enjoyed making this card I hope it inspires you to have a go. Don't forget to join us on the challenge blog http://cuteasabuttonchallenge.blogspot.co.uk 
The Digi stamp is available at 
http://cute-as-a-button-stamps.myshopify.com/  use code NEWRELEASE25. 
Entered into the glitter and sparkle challenge number 163 http://glitternsparklechallengeblog.blogspot.co.uk/2015/11/challenge-163.html?m=1 

Saturday, 7 November 2015

Shhh! Sleeping fairy ...... Sneaky peaks

This week has been a busy week behind the scenes at fairy hollow HQ.
I have been making wool fairies and Angels and more Christmas decorations many of these will only be available on a one off basis. 
I'm getting ready for Christmas with an elf hat and Christmas tree brooches 
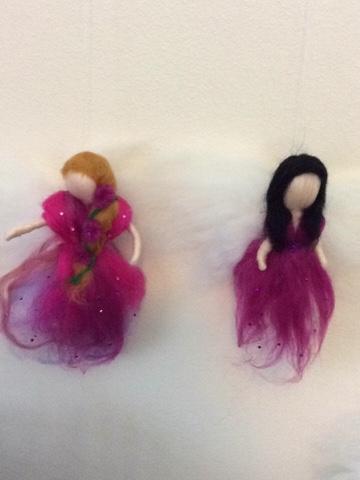
And above that are two of my gorgeous and blinged fairies. It's not just me been busy making new things. Francesca at Cute as a button has been working her socks off I can share a couple of her special sneak peaks with you they are gorgeous. I have made a super special card with one of the designs and I can't wait to show you all.
You can pop along to http://cuteasabuttonchallenge.blogspot.co.uk/2015/11/welcome-to-challenge-16-christmas-and.html and find out how to join in the challenge too! :) 

Sunday, 1 November 2015

Start of the Christmas season fairs -10 top tips

Yesterday was the start of my Christmas Fairs and fetes. So I thought of some tips for crafters doing fairs.  So here's my top tips.
1. Wear comfy shoes your going to be on your feet all day you don't want to be hobbling by the end of the day 
2. Be prepared make a list of what you need and check it off. Cellotape, scissors, bags and tissue paper are always a good idea and some pens and papers so you can write down your sales.
3. Practice your set up at home and check the front of your table throughout the day to make sure it still looks in top condition as you sell stuff.
4. Have a float with plenty of change. (And as some places charge for tea and coffee take a couple of £'s or flask)
5. Chat to other crafters the Crafting community is very supportive and a bit of networking is always good as you never know you might need a present in a few weeks and you think if that lady that did the cute purses but you forget to get her card oops. Swap cards with folk if you can. This year I'm trying to buy as many handmade gifts as possible.
6. Smile and chat to folk even if you don't get lots of sales today people will remember you if you are smiling and positive about your craft. I live to make things I enjoy everything about making and this comes across I get invited to a lot of fairs because I'm  enthusiastic about my makes. A lot of my online sales are from when people have taken my business cards from fairs. 
7. Take your lunch and some snacks it's a long day if you don't have something to eat.
8. Take plenty of business cards how can folk find you later if you don't ?
9. Do a bit of research before booking fairs at the start of the year I booked as many as I could anywhere I could. Make sure the one you are going to is well advertised and well organised (I went to one that was supposed to be 10-4 we got in at 9.50am and had to pack up and be out by 3pm I have been to some that are exceptionally well organised brilliantly advertised these can be more expensive but I made 10 times what I do at smaller ones)
10. If you have a fair that's a bust don't give up sometimes what you sell might just not be what folk are looking for don't be downhearted. Try again maybe it was the wrong fair for you.
Some of my cards laid out on display 

Tuesday, 27 October 2015

Cancer Awareness Card Both Digi Stamp and Paper from Cute as a Button

Here is the Card I made.
I'm so very pleased to show you all this is my first card I have made as part of the Cute as a Button Design team. I used the Find a cure Digi image http://cute-as-a-button-stamps.myshopify.com/products/digital-digi-stamps-big-eyed-digi-img00096-find-a-cure-cute-as-a-button-by-francesca-lopez
I coloured this in using my pencils and then fussy cut it out. I mounted this on my chosen paper.
I used the Cupid romance digital papers 6x6 http://cute-as-a-button-stamps.myshopify.com/collections/digital-download-papers/products/copy-of-dp00003-cupid-romance-digital-papers-6x6 which i enlarged and printed out so that the clock was more prominent. I then trimmed it to fit my card (6x6) 
I then added 5 baby pink heart embellishments and one dark one. I also added a pink ribbon. This card is especially close to my heart as my Grandad has very recently been diagnosed with Cancer and he is waiting to have an operation to have it removed. 

I'm very close to my Grandparents as they helped to bring my sister and me up. My dad was a single parent so my Grandparents often stood in for him picking us up from school watching our assemblies or plays giving Dad a week of peace in the summer. When i had a very hard time a few years ago a relationship breakdown and was selling just my house, I moved back across the country and in with Nana and Grandad.
They've had a pretty rough year Nana had a heart attack in August and was rushed in for Emergency surgery while she's been recovering Grandad has been a total Gem, doing all the housework, making sure she rests running to the shops for her (4 times one day considering he can no longer drives down he's 80 years old  it's no mean feat) helping her with daily tasks. He's such a great guy for 20+ years he worked as secretary of his local Royal British legion branch doing committee work he retired recently at 80 he decided it's time to slow down.
I'm praying for his swift recovery 

Sunday, 25 October 2015

So very exciting ....

I have to share this with all of you as I am so very excited. I have been doing colouring in for a we while and I have been working with SarahJayne quite a bit she is giving me proper colouring lessons as well as the fairs and shows we've been going to. Well I applied for the Dt design team at Cute as a button and I have been accepted. I adore the Cute as a button design stamps, they are gorgeous and I can hardly believe I have been so Lucky so be accepted. It is a real honour I can hardly wait to get started, im looking forward to working with the other designers and to of course show you guys the finished cards or projects. For those of you who havent yet seen the Cute as a button stamps by Francesca Lopez head over to this page http://cute-as-a-button-stamps.myshopify.com/collections/all and have a look around. You'll soon see why I am so excited. Well anyways it's well past my bedtime and I need to get a good night's sleep the ideas are all jumping around my head.
Sweet Dreams. 
Just realised this didn't post on mon night I must have been so sleepy I clicked the wrong button so posting now keep your eyes peeled very shortly for my first card 😊